This is my first time writing a post like this so hopefully it goes well and most importantly makes sense! My photo editing for insta isn't really a long process, it all depends on the quality originally, but I do get a lot of questions on it so i thought I'd write a post about it! So here are the ins and outs of my process...
Camera, Lighting & Background
First things first, the camera... now I wish I could say I use a fancy professional camera but sadly I don't (maybe one day) but I actually use my phone! I use my iPhone 7 plus to take all of my photos for insta, and it does the job lol. As for lighting I try and take any photos in natural day light and most importantly with a white based background. This makes your photos look brighter when the background of the photo is plain, and makes the object (aka you) stand out more!
Apps & their orders
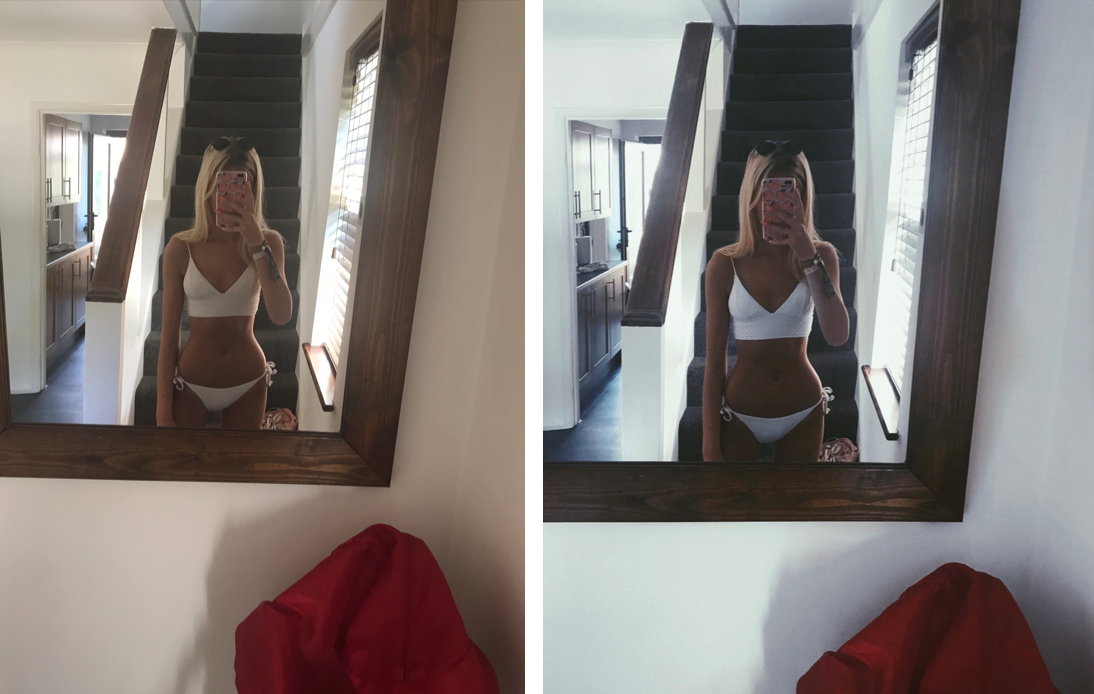
1. iPhone CameraI tend to first have to go through 100s of photos to find one decent one good enough for Instagram. I then go onto iPhone camera roll photo settings - what a mouth full - and alter the orientation (I think thats the word) to make sure its straight, as you can see above in the first picture the mirror is wonky and in the second its straight. This is normally all I do on the camera settings, however I sometimes make the brightness of pictures higher in some duller pictures.
2. Color Pop
One app I sometimes use on photos with busy backgrounds is Color Pop, this app is my go too for outfit photos that you want to make stand out, or in photos I want to hide a colourful background in. Color Pop basically turns your photo black and white, so you can then re-add colour back to the parts of the photo you want to show. Click here to see an example from my insta.
3. Facetune
Facetune is my saviour in terms of brightening up my pictures. I always use the whitening tool on walls, backgrounds and basically anything white to turn a picture from dull to bright, its crazy how much this can change the picture! Be careful not to over do it though, as it can look too fake but if you do it subtly, then you have the power to change beige tinged walls to crisp white ones. In addition to this, on closer photos I sometimes use the smooth tool to smooth skin like on my legs or chest!
4. VSCO
VSCO is one of my favourite apps, it can completely change your instagram into an aesthetic page, whether you us the same filter continuously like I do, or use a mix of complimenting filters as I've tried in the past! So yeah thats it really, if you haven't already clocked on, the vsco app is all about filters.
My personal favourite is the P5 filter, which I use at around +7 or +8 so the filter is not too strong and doesn't take away the effects of the photo. The P5 filter is my favourite for summer, especially palm tree and beach photos because it makes everything blue more vibrant and summery. It also makes you look more tanned, which I can't get enough of! The most questions I get about my Instagram editing is about the filter i use, so now the secret is out lol.
As for editing that normally is all I do, I sometimes use a few of instagrams editing bits and bobs but that is very rare!!

Last But Not Least
The End
Ta da you're done!
I hope that made some sense and you can take some tips from my editing!
Check my insta here - @nicolakaik
No comments
Post a Comment